
Today we are going to see Installing Primary & Secondary STRM Event Processor on STRM 5000 series appliance. This is in continuation to "Installing Primary & Secondary STRM Console."
To re-image STRM from any previous version to 2009.2 and above perform the steps mentioned in "How to reimage STRM from any previous version to 2009.2" from "Step 8" follow the below mentioned steps.
Installing Primary STRM Event Processor
1) Type “Flatten” to format the disk and install CentOS
 |
| SETP 1 |
2) CentOS installation in progress.
 |
| STEP 2 |
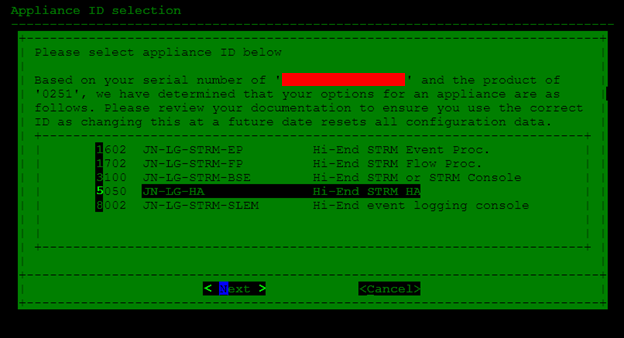
3) Select the appropriate STRM appliance ID. In our case we want to install “Primary STRM Event Processor” hence select “1602”
 |
| STEP 3 |
4) Select “Normal” for Normal STRM Setup, For HA Recovery setup select “Recovery” In our case we are performing a fresh setup hence select "Normal"
 |
| STEP 4 |
5) Select the Time zone continent
 |
| STEP 5 |
6) Select Time zone City / Region.
 |
| STEP 6 |
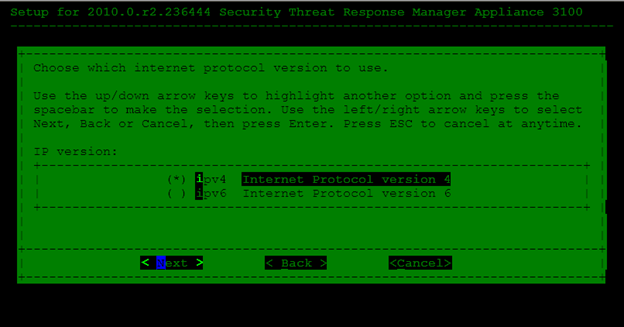
7) To configure IPv4 address Select “IPv4”
 |
| STEP 7 |
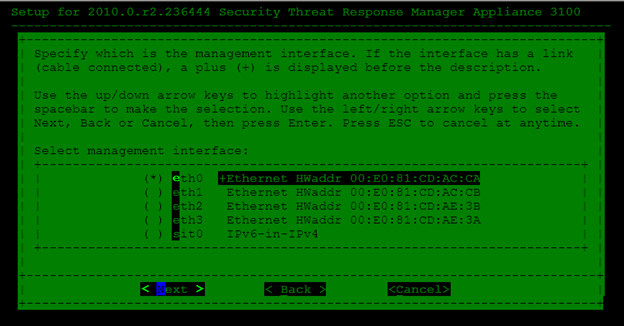
8) Select “Eth0” to configure the IPv4 address
 |
| STEP 8 |
9) Configure the Fully qualified Hostname, IP address, Net Mask, Gateway, Primary / Secondary DNS and Email server.
 |
| STEP 9 |
10) Enter the Root password
 |
| STEP 10 |
11) Confirm Root Password.
 |
| STEP 11 |
12) Enter “OK” so save the configurations
 |
| STEP 12 |
At this stage we are done with installing Primary STRM Event Processor.
Installing Secondary STRM Event Processor
Now Lets Install the Secondary STRM Event Processor. Follow the above mentioned steps for re-imaging the box with 2009.2 and continue Steps 1 and 2 mentioned in "Installing Primary STRM Event Processor"
3) Select the appropriate STRM appliance ID. In our case we want to install “Secondary STRM Event Processor” hence select “5050”
 |
| STEP 3 |
4) Select "No" as we are installing a Stand-by for a STRM Event Processor.
 |
| STEP 4 |
Now follow the Steps 5, 6, 7, 8, 9, 10, 11 and 12 mentioned in "Installing Primary STRM Event Processor". At this stage we are done with Installing Secondary STRM Event Processor.
Now we need to add the Primary Event Processor as a Managed Host and add a HA host to the Primary STRM Event Processor.
To add as a Managed Host (Primary STRM Event Processor in STRM Console)
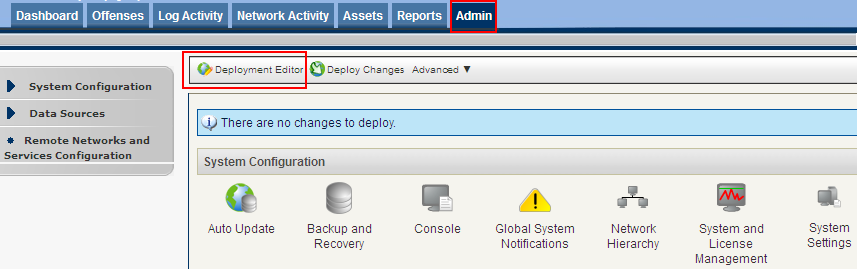
1) Login into the STRM Console and navigate to "Admin" Tab => "Deployment editor".
 |
| SETP 1 |
2) Click on Add new managed host
 |
| STEP 2 |
3) Click on Next
 |
| STEP 3 |
4) Enter the STRM Primary Event Processor IP address, root password & confirm root password and click on Next
 |
| STEP 4 |
5) Click on Finish, This might take upto 2 to 5 mins to add the Primary STRM Event Processor as a Managed host in STRM Console.
 |
| STEP 5 |
6) Now we have successfully added a STRM Event Processor as a Managed host. From the menu click on "File" => "Save and Close"
 |
| STEP 6 |
7) Click on "Deploy Changes" to deploy the changes.
 |
| STEP 7 |
Now we have successfully add the Primary Event Processor as a Managed Host in STRM Console.
To add a HA Host (Secondary Event Processor)
1) Login to the Primary STRM Console GUI by accessing https://ip_address and navigate to "Admin" Tab => "System and License Management".
 |
| Admin TAB |
2) Click on the Primary STRM Event Processor Host, from the Menu click on "Action" => "Add HA host".
 |
| STEP 2 |
3) The IP address of Primary STRM Event Processor which we have configured during installation will become the "Cluster Virtual IP address", Enter the New IP address for Primary STRM Event Processor, IP address for Seondary STRM Event Processor which we have configured during installation, root password & confirm the root password.
 |
| HA Config Wizard |
4) Click on Next and review the parameters and Click on Finish.
5) Now STRM will add HA host for Event Processor and the Process of adding a HA host might take up to 8 to 10 hours depending on the storage capacity of "/store" partition as it will try to sync.
We are done right here!!! Stay tuned and we will have a look at installing "Installing Primary & Secondary Flow Processor"
 |
| Leave your comment below |

No comments:
Post a Comment